
The inspiration for this tutorial came from John's Fireworks 4 Neon Tutorial. Thanks John!
If you would like to offer any of my tutorials to your groups or classes, please contact me first. Please list the name of your group or class, and your website if you have one. Thanks so much!
If you like my Paint Shop Pro tutorials, be sure to take a peek at my new tutorials at Debbie T Designs. Learn how to build your own web site with free tutorials for xhtml and css!
1. Create a new canvas 450x250 - with a black or dark background.
2. Add a NEW Layer.
3. Choose the Text Tool ![]() .
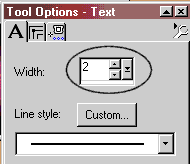
On your TOOL OPTIONS palette, choose LINE WIDTH: 2, and a basic
straight LINE.
.
On your TOOL OPTIONS palette, choose LINE WIDTH: 2, and a basic
straight LINE.
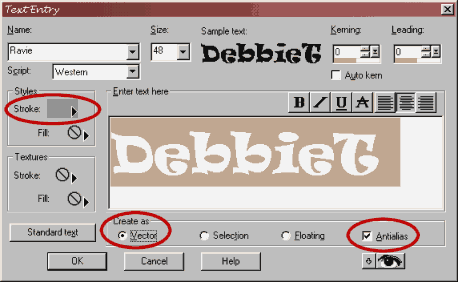
4. Once your option settings are chosen, click once on your canvas. The Text Dialog Box appears. Choose a thick font, good for your neon sign. I am using Ravie size 48. Stroke is GREY. Fill and Textures are NULL. Check VECTOR and ANTIALIAS settings.
5. Click OK when your text has been entered and the settings are
chosen. Your text will appear on the canvas with a VECTOR bounding box around
it. If you need to move your text, use the Vector Selection Tool
![]() and move the text in the center of your canvas. When you are all finished,
click once on a blank area of the canvas and the text will be UN-selected.
and move the text in the center of your canvas. When you are all finished,
click once on a blank area of the canvas and the text will be UN-selected.
Make sure to SAVE your image regularly through out this tutorial.
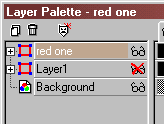
6. Let's check on the Layer Palette. You will see your Background layer along with a new (Vector) Layer 1 with your text. Right-click on the Vector Layer, and choose DUPLICATE. Now a "copy of Layer 1" is on the Layer Palette. Double-click the layer on the palette and rename to "red one." We will be duplicating layers a couple more times in this tutorial.
7. Let's work with the "red one" layer right now. HIDE
Layer 1 by clicking the sunglasses icon next to Layer 1.
8. With the Vector Selection Tool ![]() ,
double-click on the text on the canvas to open the VECTOR PROPERTIES
Dialog box. You should see the Grey color stroke with a width setting of 2.
Let's change the stroke to RED. You will notice the change immediately
on your canvas. Click OK to set.
,
double-click on the text on the canvas to open the VECTOR PROPERTIES
Dialog box. You should see the Grey color stroke with a width setting of 2.
Let's change the stroke to RED. You will notice the change immediately
on your canvas. Click OK to set.
9. Ready for one more duplicate? This time, right-click on the "red one" layer and click DUPLICATE. You will now have three vector layers. Rename the newly copied layer "red two."
10. HIDE the "red one" layer. You will now have 2 hidden layers. The "red two" layer should be your active layer.
11. Before we can apply any effects, this VECTOR layer must be converted to RASTER. Right-click on the "red two" layer and choose CONVERT TO RASTER. This changes it to a regular bitmap layer and all effects can be applied.
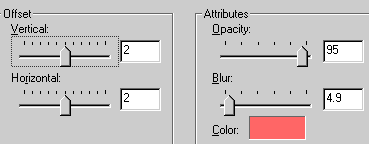
Let's add a drop shadow. Click Effects>3D Effects>DROP SHADOW.
Here are the settings I used (medium red for the color.)
12. HIDE "red two" layer.
UN-hide "Layer 1"- this layer should be the active layer. You will see the Grey Outlined text on the canvas. Now CONVERT TO RASTER, and apply the DROP SHADOW to this grey text. Use a light grey for color and 1 & 1 for offset amounts.
13. HIDE "Layer 1."
UN-hide the "red one" layer. CONVERT TO RASTER. Click Effects>Blur>GAUSSIAN BLUR with Radius of 2.0.
14. While still on the "red one" layer, apply a DROP SHADOW. Slightly Dark RED for color and 2 & 2 for offsets.
15. Apply one more DROP SHADOW, and use a Medium RED for color.
16. Now, we are finished with the graphics portion of the animation. UN-hide "red two" to check it out. Looks ok?
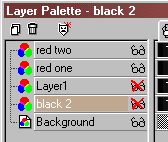
17. DUPLICATE the Black BACKGROUND layer, rename "black2."
HIDE "black2." Here is what your Layer Palette should
look like at this point.
14. You might want to SAVE A COPY (File>Save Copy as) of your image at this point if you want to make adjustments to it later. We will be merging layers next.
15. Click to make "red two" the active layer, and then click Layers>Merge>MERGE VISIBLE. Rename the merged layer "red."
Now HIDE the "red" layer. Let's merge the other two layers. UN-hide "layer 1" and "black 2," (make sure one of those two layer is the active layer) then click Layers>Merge>MERGE VISIBLE. Rename this layer "grey."
16. Toggle between hiding and unhiding the "red" layer and you will get the idea of what your animation will look like.
17. Last thing to do is CROP away the blank space around the text. Happy with your image so far? SAVE! (make sure to UNHIDE both layers before saving.)
Let's get to animating in Part TWO.
Learn (x)HTML & CSS ~ Paint Shop Pro Tutorials ~ Contact debbieT ~ Beginners ~ Free Backgrounds ~ Home