BEGINNER PSP 7 Tutorial
Basic Knowledge of Layers and the Color
Palette is assumed.
EYE CANDY 4000 is OPTIONAL.
***Don't worry, if you don't have Eye Candy, there is a work-around.
Download the zipped file containing my seamless
bubble tile***
If you would like to offer any of my tutorials to your groups or classes, please contact me first. Please list the name of your group or class, and your website if you have one. Thanks so much!
If you like my Paint Shop Pro tutorials, be sure to take a peek at my new tutorials at Debbie T Designs. Learn how to build your own web site with free tutorials for xhtml and css!
1. First create a new canvas. 1600w x 100h Transparent bg.
After creating the canvas, you might see the new image in less than 100% view. Click VIEW>NORMAL VIEWING (1:1) and this will now make the image window scroll.
Scroll all the way over to the far left so you can see how your border will be shaping up.
2. On your layer palette, rename Layer 1 to "bottom"
3. Choose a color for your background as your foreground color. Choose
the FLOOD FILL tool ![]() on the toolbox and click once on the "bottom" layer to flood fill
with the foreground color.
on the toolbox and click once on the "bottom" layer to flood fill
with the foreground color.
4. Add a NEW LAYER, named "bubbles".
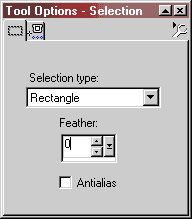
5. Choose the SELECTION Tool ![]() from the toolbox, and on the Tool Options settings palette, UNCHECK Anti-Alias,
Selection Type is RECTANGLE and feather is 0. (see below)
from the toolbox, and on the Tool Options settings palette, UNCHECK Anti-Alias,
Selection Type is RECTANGLE and feather is 0. (see below)
6. Now, Double-click the SELECTION Tool ![]() ,
and in the dialog box, type in the settings listed below:
,
and in the dialog box, type in the settings listed below:
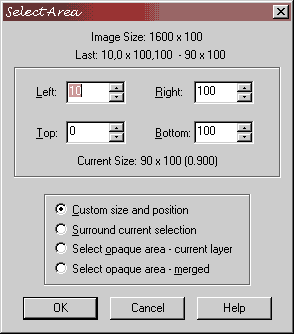
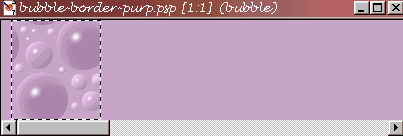
When you click on OK, the selection MARQUEE (marching ants), will now be set to these exact dimensions on your canvas - 90x100.
7. Make sure you are on the "bubble" layer, and FLOOD FILL with the same foreground color. You won't notice much of a difference on your canvas.
Now would be a good time to SAVE your image.
At this point if you don't have Eye Candy, go to step 8a.
8. Click EFFECTS>PLUGIN>EYE CANDY>WATER DROPS. These are the settings that I used.
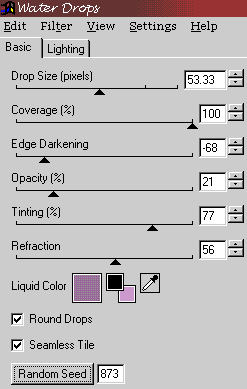
When you click OK, the bubbles will be added to the selection as a seamless tile.
8a. This step is for those who do not have Eye Candy. Did you unzip the Bubble.zip? Remember where you saved the seamless "bubble_tile.jpg" and open it in PSP.
Change the foreground color swatch to PATTERN (click for color palette help). Click the Pattern swatch to open the Pattern Dialog Box. Move the Scroll Lever all the way to the top of the list of patterns. You will find all the opened images on your workspace, along with all the other saved patterns. Choose the bubble_tile swatch.
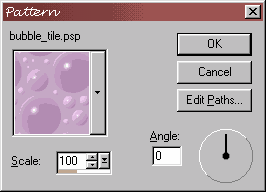
Note: make sure to use 100% SCALE, ANGLE 0.
Now, flood fill your selection. The seamless bubble tile should fit nicely into the 90x100 selection marquee.
Okay, we are all on the same page now....Here is my image so far:
Onto PART 2
Learn (x)HTML & CSS ~ Paint Shop Pro Tutorials ~ Contact debbieT ~ Beginners ~ Free Backgrounds ~ Home