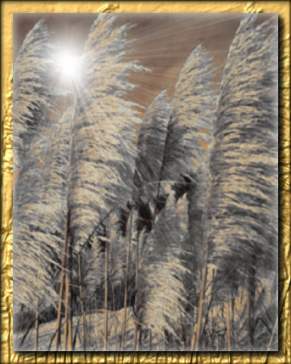
My Finished Image
This is the image that I used for this tutorial.
Click on the Thumbnail
to view the full sized image
right click on it to save for yourself.
If you would like to offer any of my tutorials to your groups or classes, please contact me first. Please list the name of your group or class, and your website if you have one. Thanks so much!
If you like my Paint Shop Pro tutorials, be sure to take a peek at my new tutorials at Debbie T Designs. Learn how to build your own web site with free tutorials for xhtml and css!
| My Finished Image |
This is the image that I used for this tutorial. Click on the Thumbnail to view the full sized image right click on it to save for yourself. |
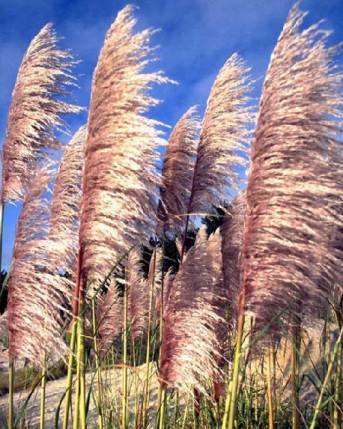
1. Open the image you would like to apply the effects to. Then duplicate (shift + D)and close the original. If the first layer in your image is named "background", double click and rename to "Layer1" or your choice. Now we are ready to begin to try out some effects.
2. Click on Effects >Artistic Effect >Sepia ----Use the settings in my example, or your own. I used 100 as the amount to age. Notice the white arrow -- this is pointing to the "Proof" button. Click on this button and you will see the effect on your actual image. The little arrow button next to it is the "AutoProof" button. This will automatically show the effect on your image every time you change any settings. I like to leave the Auto-Proof off, so it saves on time, and when I like what I see in the preview window, I click Proof to see it on my fullsized image. Take a look at the bottom right corner of the effect dialog box. Do you see the little box with x's and an undo arrow - this is the "reset to default settings" button. So if you totally screw up and hate what you just did, click this and it goes back to the default setting.
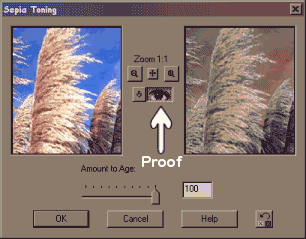
When you are satisfied with your setting for Sepia, Click Okay.
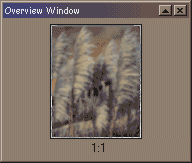
You might have noticed a new window, along with the usual Tool Options and Layer Palette. This is the Overview Window. When you are zoomed in on an image, you can see the entire image in this window. An outlined rectangle appears in the window, and you can use your mouse to drag the rectangle for viewing different areas of the zoomed image.
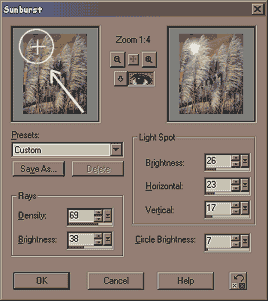
4. Let's try another effect. Click on Effects >Illumination Effects >Sunburst ------ Use the settings in my example, or experiment on your own. Notice my arrow is pointing to a cross on one of the preview panes. Use your mouse to drag the cross around your image to set the sunburst exactly where you want it. The first set of settings is for the "Rays" - the second is for the Light Spot. And then there is Circle Brightness. If you find that you just love the setting you just created, then use the "SaveAs" option and keep it for a future use. Or you can use the presets. (***NOTE: This image does not show the "color button" click it to change the color of the sunburst)
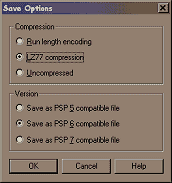
5. At this point, we should save our image. File >Save -- ***If you plan on opening this image in an older version of psp, click on the Options button. Click on "Save as PSP 6 compatible file" and click okay.
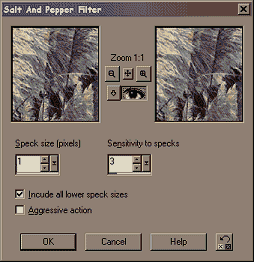
6. Click on Effects >Noise >Salt & Pepper Filter. You can use my settings or experiment with your own ideas.
Learn (x)HTML & CSS ~ Paint Shop Pro Tutorials ~ Contact debbieT ~ Beginners ~ Free Backgrounds ~ Home