If you would like to offer any of my tutorials to your groups or classes, please contact me first. Please list the name of your group or class, and your website if you have one. Thanks so much!
If you like my Paint Shop Pro tutorials, be sure to take a peek at my new tutorials at Debbie T Designs. Learn how to build your own web site with free tutorials for xhtml and css!
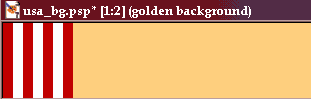
1. Create a new canvas 1600x150 - with a golden background. Click View>NORMAL VIEW 1:1 to view the image at 100%. Move the scrollbar all the way to the left side of the image window. This is the area where the border will be created.
2. File>SAVE - name your image. I named mine "usa_bg.psp" - always save your original files as .psp format.
3. Click Layers>NEW RASTER LAYER to create a new layer on the Layer Palette. Name this layer "red".
4. Click once on the Selection Tool ![]() .
Make sure that Anti-alias is UNCHECKED on the Tool Options Palette.
.
Make sure that Anti-alias is UNCHECKED on the Tool Options Palette.
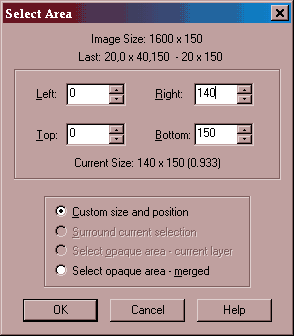
Now DOUBLE-click the Selection Tool. The Selection Area dialog box will appear. We want to create a selection for the red border area. Type in dimensions of Left:0, Right:140, Top:0, Bottom:150. Click OK. This will create a selection of 140x150.
5. Click Layers>NEW RASTER LAYER to create a new layer on the Layers Palette. Name it Stripes.
6. Change the Foreground color to RED and with the Flood Fill Tool
![]() ,
click to fill the selection marquee.
,
click to fill the selection marquee.
7. Change the Foreground color to WHITE and let's make some stripes. There will be 3 stripes and we will create them using the selection tool.
8. Double-click the Selection Tool again. (You still should have anti-alias UNchecked on the tool options.) This time enter the dimensions of Left:20, Right:40, Top:0, Bottom:150. Click OK.
9. With the Flood Fill Tool, click to fill this marquee with white.
10. Create two more separate custom selections and fill with white. The dimensions will be Left:60, Right:80, Top:0, Bottom:150 and for the last one Left:100, Right:120, Top:0, Bottom:150.
Okay, is it starting to look like this? (my example is resized and cropped)
11. Now let's add some stars. This is where your creativity will take over. You can add one larger star, three medium sized stars, or maybe a bunch of little stars. I have created my background border with 3 blue stars, and am adding "U-S-A" one letter for each star. If you decide to create one larger star, you can add the full text "USA". Use your imagination.
Create a NEW RASTER LAYER named "Star 1" - it should be the top layer.
Change the Foreground Color to BLUE - Optional Black Stroke (Background color).
12. Click on the SHAPES Tool ![]() and choose the "Star2" shape from the Tool Options Menu.
Also, UNcheck Vector, Uncheck Retain Style, CHECK anti-alias.
and choose the "Star2" shape from the Tool Options Menu.
Also, UNcheck Vector, Uncheck Retain Style, CHECK anti-alias.

13. Place your cursor/mouse on the canvas, and while holding the SHIFT key, click and drag a star on the canvas. (holding the shift key allows the dimensions to remain proportional)
14. Add two or more stars to canvas. Make sure to add a new layer for each star for easy repositioning.
Each of your stars should be on a separate layer, use Mover tool to position each one on the striped side border.
Save your image regularly!
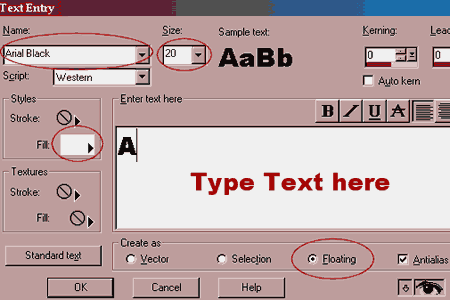
15. Change the Foreground color (fill color) to WHITE. Background color (stroke) is NULL. Add a new layer named "text".
16. Click the Text Tool ![]() and click once on the canvas. The Text Dialog box will appear.
and click once on the canvas. The Text Dialog box will appear.
Choose Font, Size, and create as FLOATING. Click OK. Depending on the style of your star border, type the letter "U" or whole word "USA"
17. The Text will be added to your canvas, but with a floating selection marquee around it. Move your mouse over the text and watch for the cursor to change to the Mover Cursor. As long as your text is floating, you can move the text around the canvas. Position it on a star.
18. Add the other letters "S" and "A" and position them on the other two stars. Create separate layers for each new letter.
19. And that is it. All that is left to do is save again, and then export as a .gif - File>Export>Gif. This will make a great background for a webpage because because the image is all solid colors, so the file size will be kept nice and small. I exported my gif with 100 colors as a Optimized Octree with no dithering - file size 5kb.
Thanks so much for your support!
Learn (x)HTML & CSS ~ Paint Shop Pro Tutorials ~ Contact debbieT ~ Beginners ~ Free Backgrounds ~ Home