
If you would like to offer any of my tutorials to your groups or classes, please contact me first. Please list the name of your group or class, and your website if you have one. Thanks so much!
If you like my Paint Shop Pro tutorials, be sure to take a peek at my new tutorials at Debbie T Designs. Learn how to build your own web site with free tutorials for xhtml and css!
7. At this point we want to save again ---- One new option in version 7 is the ability to "Auto-Save" -- to access this option, click File >Preferences >Auto Save Settings; click the check box and fill in the time. This is a great option for those of us who regularly have psp crashes!
8. Now, we want to make a selection to make a frame around the image. Double click on the selection tool, and the dialog box will come up. The image I am using is width=343 by height=429 - and I want a selection that is 15 pixels wide. So, the Left amount will be 15, the Right will be 328 (that is 343 minus 15), the Top will be 15, and the bottom will be 414 (429 minus 15) -- You can use your own dimensions and make a bigger or smaller frame.
9. Click on Selections >Invert --- At this point, your image should look simular to this.

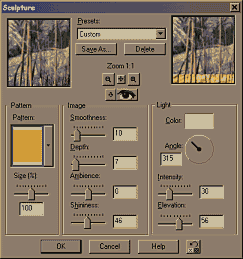
10. Now, click on Effects >Texture Effects >Sculpture --- I am using Pattern #1 which is a solid gold color. - you can use my settings, or your own -- Smoothness(10), Depth(7), Ambience(0), Shininess(46), Color(white), Angle(315), Intensity(30) -- There are also some presets you can use. Use the preview window and the Proof option until you get the effect that you want. I like to have the branches in my image to have a raised look to them, it looks like the gold was poured over the image -- like a sculpture.
11. Click Selections >Invert -- the middle area of the image will be selected. Now we want to add a Drop Shadow to our image. -- Effects >3D Effects >Drop Shadow --- You can use my settings or your own. Vertical & Horizontal(7), Opacity(65), Blur(6) -- The great new thing about version 7 is that the Drop Shadow can be proofed, where in version 6, it could not.
12. Click Selection >Float --- Then click Effects >3D Effects >Cut-Out --- I used Vertical & Horizontal(4), Opacity(40), Blur(14), Shadow Color(white), Fill Interior NOT checked.
13. Now do the Cut-Out again, but instead use Vertical & Horizontal(-4) -- At this point, the image should look like it is on top of the frame portion of the image
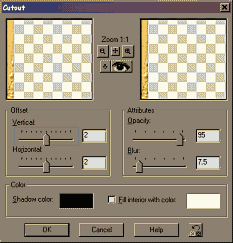
14. Selections >Invert so the selection is around the frame area -- Selections >Float --- then Effects >3D Effects >Cut Out -- Using my settings or your own. I used Vertical & Horizontal(2), Opacity(95), Blur(7.5), Shadow Color(black)
15. Selections >Select None -- You can resize and save your image -- and
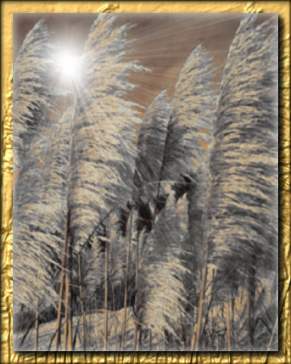
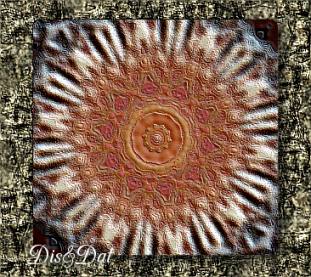
we are finished. Below is the my finished image, along with another image
that was done with some of the other new effects.
Learn (x)HTML & CSS ~ Paint Shop Pro Tutorials ~ Contact debbieT ~ Beginners ~ Free Backgrounds ~ Home