DisDat Designs Paint Shop Pro 7 Tutorial Rose in Mirror ~ Part 1
If you would like to offer any of my tutorials to your groups or classes, please
contact me first. Please list the name
of your group or class, and your website if you have one. Thanks so much!
If you like my Paint Shop Pro tutorials, be sure to take a peek at my new tutorials at Debbie T Designs. Learn how to build your own web site with free tutorials for xhtml and css!
This is a BEGINNER'S TUTORIAL, but assumes knowledge of the
PSP 7 color palette. If you need help with the PSP 7 COLOR PALETTE, please
Click Here for my tutorial. Tutorial Examples
are resized/cropped for easier viewing.
1. Decide what color scheme you would like for your image - I am using PURPLE. Create a new transparent image> 500x500.
2. Add a new layer (Layers> New Raster Layer) ~ name it "Frame".
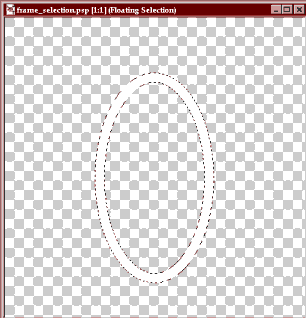
3. Click the SELECTION tool, ELLIPSE, Anti-Alais CHECKED. Create the shape of your mirror. Change the first Style color swatch to solid color White/No texture (see Color Palette Tutorial if more details are needed). Click the FLOOD FILL tool, and fill the selection with white.
4. Selections> Modify> Contract> 15 or 20 (your choice);
Click Selections> Save to ALPHA CHANNEL. Leave as default info in
alpha channel dialog box, click OK, click OK again. Then click the Delete
key on your keyboard (or Edit> Clear) to clear the white fill inside the
selection. This makes the shape of frame for the mirror.
5. Selections> Select None ~ Selections> Select All. ~ Selections> Float. The white frame will now be selected.
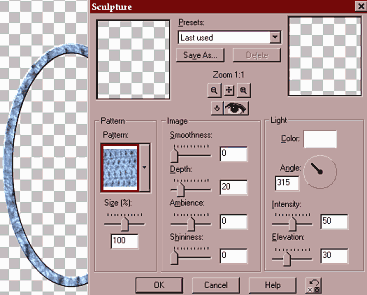
6. You can use a Blade Pro preset for the color of the frame, or click Effects> Texture Effects> Sculpture. I chose #47 Pattern -- below are my settings. ***Note: Don't worry about choosing a Pattern that doesn't match the color scheme for your mirror. We will use the colorize effect to fix that.
If you haven't already done so, SAVE your image as .psp extension. If you plan on opening your image in previous versions of psp, then click on the options button, and choose the appropriate compatibility.
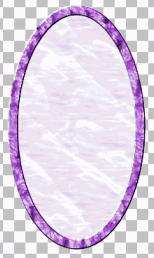
7. If your mirror frame isn't the color of your choice, click Colors> Colorize. Adjust the levers: Hue is the color, Saturation is how bright (or saturated) that color is going to be. For my shade of purple: Hue(199) & Saturation(139).
8. Click on the bottom layer in the layer palette. Layers> Add new Raster Layer. Name it "Glass"
9. Selections> Select None. Then Selections> Load from Alpha Channel> choose the selection you saved in step 4. Selections> Modify> Expand> 2
10. You can use a Blade Pro preset, or another Sculpture Effect for this step, but I am going to use a Glacier Pattern Flood Fill. Change the Background color to white. Change the Style Foreground Pattern to Glacier> Angle 40, Scale 100 and Foreground Texture to Ocean. (see Color Palette Tutorial if more details are needed) **Note: Make sure to check the "Lock" setting on the color palette.
11. Click the FLOOD FILL tool and RIGHT-CLICK to fill the selection with white. LEFT-CLICK to fill with the Glacier Pattern. You might want to click two times if you want the glass to be darker. I also colorized my glass with a lower saturation of purple. SAVE your image.
If you would like to link to my Paint Shop Pro tutorial(s), please contact
me first, with your website url and group name. I would be happy to hear from you!
I am sorry, but I do not allow my Paint Shop Pro tutorials to be saved and
distributed through emails or on other websites. All I will allow is a text link to
the specific page or my main tutorial page.
Because of time restraints, I cannot answer
emails concerning Paint Shop Pro and problems with usage. I get many emails requesting help,
and I hate to have to say it, but I cannot offer Paint Shop Pro support anymore :-(
Do not copy, redestribute, or claim any graphics or tutorials
as your own. Please do not link to any graphics from your webpages.
Please respect my copyright and the other copyrights of others.
Thank you.