~ DisDat Designs ~
Paint Shop Pro 7 Tutorials
Creating a Vector Christmas Stocking
If you would like to offer any of my tutorials to your groups or classes, please contact me first. Please list the name of your group or class, and your website if you have one. Thanks so much!
If you like my Paint Shop Pro tutorials, be sure to take a peek at my new tutorials at Debbie T Designs. Learn how to build your own web site with free tutorials for xhtml and css!
This is an intermediate/advanced tutorial for PSP
7 users
This tutorial is also adapted for Intermediate/Advanced PSP6 use.
Remember to SAVE often!
This tutorial is a continuation from Part 1 and Part 2, but is also a stand-alone tutorial, for those who are less advanced and do not want to make their own vector shapes.

For those who are just joining us, this tutorial uses PSP7 Preset Shapes and Saved Selections to make a Christmas Stocking. Those with PSP6, you can use selections to complete the stocking. Click here for PSP7 Preset Stocking Shape Zip File - unzip into your PSP7 "shapes" folder. Click here for PSP6 or 7 Saved Selections Zip File - unzip into your PSP "Selections" folder. If you would like to create your own Vector Shapes for this tutorial, make sure to click on Part One. 1. Create a new canvas ~ 500x500 ~ TRANSPARENT background. |
|
|
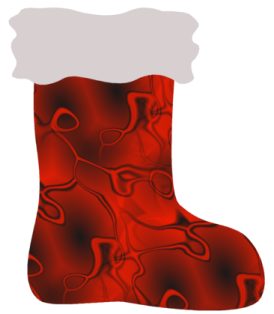
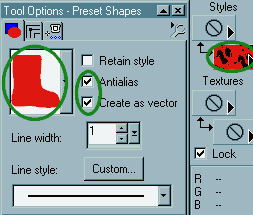
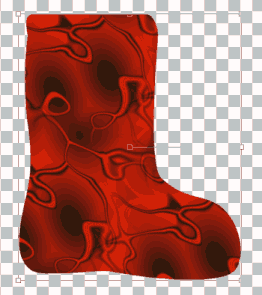
2. PSP7 users, click on PRESET SHAPES tool. If you would rather use Selections instead of shapes, then follow the PSP6 instructions. PSP6 users skip to STEP#4. For those that did not make their own shape in Part One, you should have unzipped the Christmas Shapes file into your PSP7 "Shapes" folder. Choose the Stocking shape from the pull down menu. In the Tool Options: Anti-Alias and Create as Vector. If you want to create the stocking exactly as it was made, then check off Retain Style. Change your BACKGROUND color to a PATTERN or COLOR/TEXTURE of your choice. I am using "Red Lava", although you wouldn't know it by my example image-LOL! For the stocking in the header image at top of this tutorial, I used a solid color plus a texture. Click your mouse on the canvas and drag out the stocking shape. |
|
This is my stocking so far. |
3. Click LAYERS> NEW VECTOR LAYER. Click on PRESET SHAPES, choose the Top Fluff shape from the pull down list. In the Tool Options, I am going to check off Retain Style as well as Vector, because I want the fluff to be the same color and shape as it was created. Or you can change the fill color. Click the mouse on the canvas and drag out the the fluff shape. At this point, use the vector OBJECT SELECT tool Click on the Fluffy layer and click SELECTIONS> SELECT ALL. Then click SELECTIONS> FLOAT. This will select the top fluffy part. SELECTIONS> DEFLOAT. PSP7 users skip to Step # 5. |
|
 |
4. PSP6 users: You should have unzipped the Christmas Selections Zip file into your PSP Selections Folder -- if you do not have this folder, then create a new one in your PSP directory. Add New Raster Layer, and click SELECTIONS> LOAD FROM DISK, navigate to your Selections folder and choose stocking.sel ~ Flood Fill with your favorite Color or Pattern. Add New Raster Layer, and click SELECTIONS> LOAD FROM DISK, and choose fluffy_top.sel ~ Flood fill with a white or gray of your choice. Keep the top Fluffy section still selected - and move to Step #5 |
5. For PSP 6 & 7: With our top Fluffy part selected click the TEXTURE effect. I chose Texture #43 on my list. Added a bit more Fluff to it. Also #48 looks good too. 6. Now add an INNER BEVEL effect: Round Width(15) Smooth(15) Depth(3) Ambience(0) Shininess(50) Angle(135) Intensity(50) Elevation(30) 7. PSP7 users that used the Preset Shapes: SELECTIONS> MODIFY> FEATHER> 2. Otherwise, if the saved selection was used, leave as is. 8. Add a New Raster Layer. Apply CUT-OUT effect: Shadow Color(Medium Gray) Vertical(-5) Horizontal(-5) Opacity(90) Blur(6). 9. Optional Step: Click on Layer 3 -- the layer under the "Cut-Out" layer. Apply a GAUSSIAN BLUR of .75 10. Still on Layer 3, Apply a DROP SHADOW: Shadow Color(Black) Vertical(2) Horizontal(2) Opacity(80) Blur(11) |
|
|
Click
Here for an example |
11. Optional Step: Click on Layer 2, which is the stocking layer, SELECTIONS> SELECT ALL. Then SELECTIONS> FLOAT. This selects the whole stocking. You can apply a GAUSSIAN BLUR or a TEXTURE effect. I think I will apply both. I used a blur of 2.5 and texture #51 at 25%. Makes a weave-like texture. SELECTIONS> SELECT NONE 12. Still on Layer 2, Apply a DROP SHADOW: same settings as in Step 10. |
13. Almost done: Click on Layer 1. Click on PRESET SHAPES tool. BACKGROUND/FILL color: Red (or color of your choice). ANTIALIAS, VECTOR are checked. Draw a vector Rectangle Shape for the Loop on the stocking. This will add a new Vector Layer to the Layer Palette and places an editing box around the loop shape.
Add a textured Background (fill) and crop and resize. And you are ready to export as .jpg Click Here for my final image - it will open in a new window.Thank you for your support!!
| |
 Click the middle ROTATE handle and rotate slightly. RIGHT-CLICK on Vector
Layer# 5 and "Convert to Raster Layer". I added a Dark Red DROP
SHADOW: Vertical(0) Horizontal(4) Opacity(100) Blur(2)
Click the middle ROTATE handle and rotate slightly. RIGHT-CLICK on Vector
Layer# 5 and "Convert to Raster Layer". I added a Dark Red DROP
SHADOW: Vertical(0) Horizontal(4) Opacity(100) Blur(2) Part One Part Two
Learn (x)HTML & CSS ~ Paint Shop Pro Tutorials ~ Contact debbieT ~ Beginners ~ Free Backgrounds ~ Home
- If you would like to link to my Paint Shop Pro tutorial(s), please contact me first, with your website url and group name. I would be happy to hear from you!
- I am sorry, but I do not allow my Paint Shop Pro tutorials to be saved and distributed through emails or on other websites. All I will allow is a text link to the specific page or my main tutorial page.
- Because of time restraints, I cannot answer emails concerning Paint Shop Pro and problems with usage. I get many emails requesting help, and I hate to have to say it, but I cannot offer Paint Shop Pro support anymore :-(
- Do not copy, redestribute, or claim any graphics or tutorials as your own. Please do not link to any graphics from your webpages.
- Please respect my copyright and the other copyrights of others. Thank you.