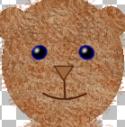
13. Left Eye: Add NEW LAYER, name it "Left Eye". Change the FOREGROUND COLOR to Navy, and the BACKGROUND COLOR to Black. Click PRESET SHAPES tool Ellipse, STROKED & FILLED, Width 2, Antialias CHECKED, and Vector UNchecked. Draw the left eye. Click on IMAGE > ROTATE, LEFT, 20°.
14. Right Eye: Click LAYERS > DUPLICATE to make a copy of the first eye. IMAGE > MIRROR. Use the MOVER Tool to place it correctly on the bear's face.

15. Eye Highlights: Add NEW LAYER, name it "Highlight". Change the FOREGROUND COLOR to White. Click the AIRBRUSH tool, Round, Size 5, Hardness 0, Opacity 90, Step 25, Density 85. Click one or two quick sprays on the Left Eye. Click on IMAGE > BLUR > GAUSSIAN BLUR, 1 Radius. LAYERS > DUPLICATE and MOVE the copy of the highlight to the Right Eye.

16. Nose: Add NEW LAYER, name it "Nose". Change the FOREGROUND and BACKGROUND COLORS to 2 shades of brown, making the darker color the foreground color. Click on the PRESET SHAPES tool, Triangle, Width 1, Antialias CHECKED, and Vector UNchecked. Draw a small triangle - making the wide part of the shape at the top and the point towards the bottom. MOVE to the right place on the bear's face.
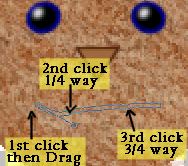
17. Smiling Mouth: Add NEW LAYER, name it "Mouth". Click the LINE DRAW tool. BEZIER curve, Stroked, Width 1, Antialias CHECKED, Vector UNchecked.
There are 3 clicks involved with a Bezier line. Start at one end of where you want your smile, CLICK and HOLD down the left mouse and drag it across in a straight line until you reach the other end of the smile. Click once at the ¼ way area of the line. Click again at the ¾ mark. There is your smile!
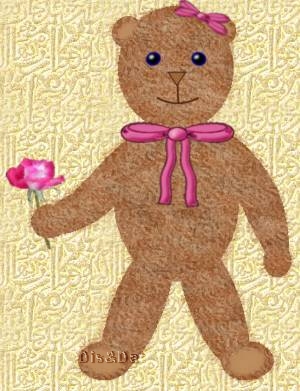
20. Add a Bow, Patch, Buttons, or a Hat -- Whatever might dress him or her up a bit. I added a flower and some bows to my little bear.